Getting Started with MrNiche Autoblogger
Five minutes from a fresh WordPress install to your first auto-generated article. No coding required.
What you need before you start
- A WordPress 6.0+ site you control (any host — shared, VPS, managed).
- An OpenAI API key with billing set up (see OpenAI API setup if you don’t have one yet).
- Your MrNiche Autoblogger license key (emailed to you after purchase, also visible in your Freemius account) — or use the 7-day free trial which doesn’t need a key in advance.
Step 1 — Install the plugin
Download the mrniche-autoblogger-pro.zip file from your Freemius account (or the welcome email we sent you), then in WordPress admin go to Plugins → Add New → Upload Plugin. Pick the zip, click Install, then Activate. You’ll see a new MrNiche Autoblogger Pro menu in the sidebar.
Step 2 — Activate your license (or start a trial)
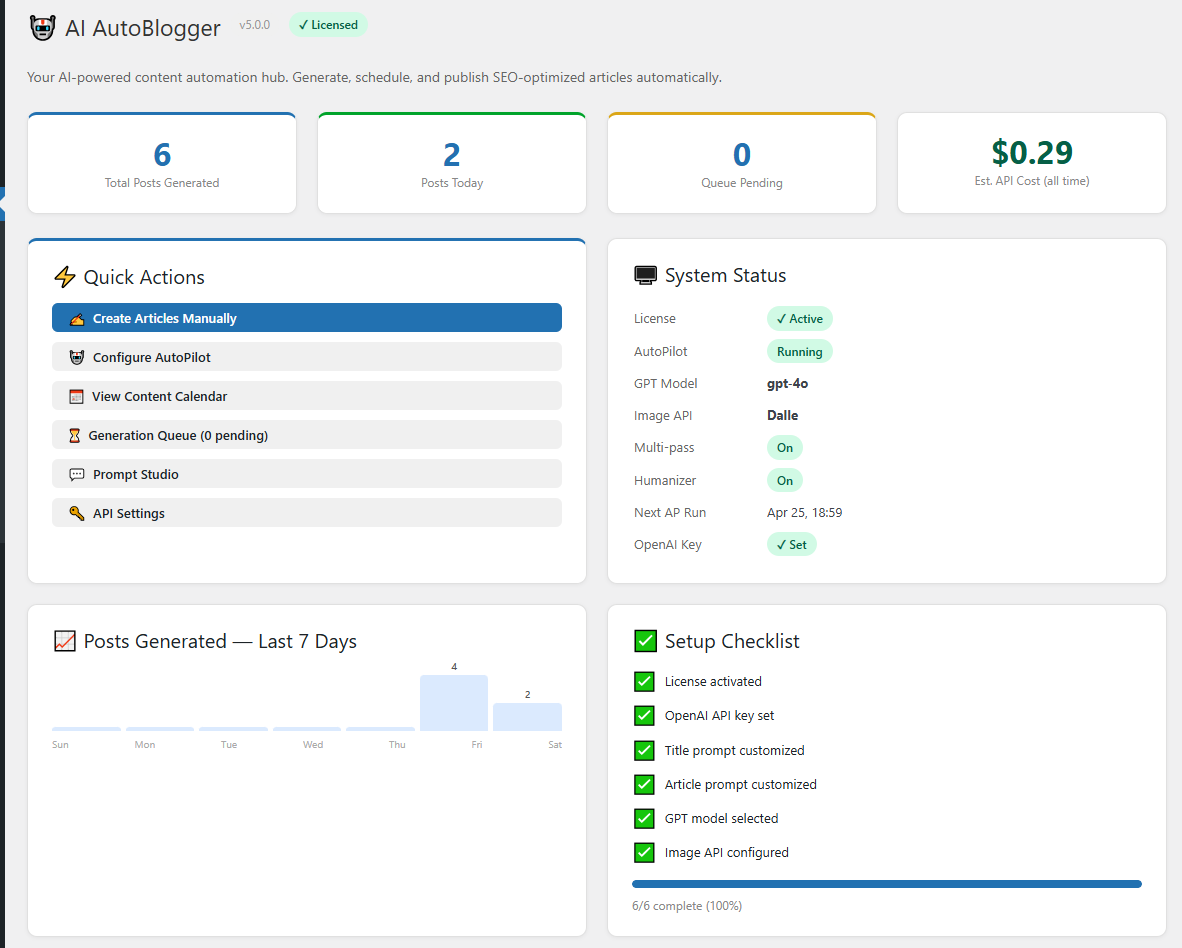
The first time you open MrNiche Autoblogger Pro after activation, the Freemius connect dialog appears. Either paste the license key from your Freemius purchase email and click Activate License, or click Start 7-day Free Trial if you don’t have a key yet. After activation, the License page shows your status — green “Active” badge with plan + lifetime entitlement, or a yellow “Trial — N days left” pill during the trial window. Until the license is activated, only the License + API Settings pages are accessible — generation features stay locked.
💡 Activation locked to a domain. Each license slot binds to one domain. If activation fails, double-check the URL in Settings → General matches what’s on the license server. To move a license to a new domain, deactivate it first from the License page.
Step 3 — Add your OpenAI API key
Go to MrNiche Autoblogger Pro → API Settings, paste your sk-... key into the OpenAI API Key field, pick a model (we recommend gpt-5.4-mini to start — best cost/quality), then click Save. The dashboard will show a “Connected ✓” indicator once the key is verified.
Step 4 — Generate your first article
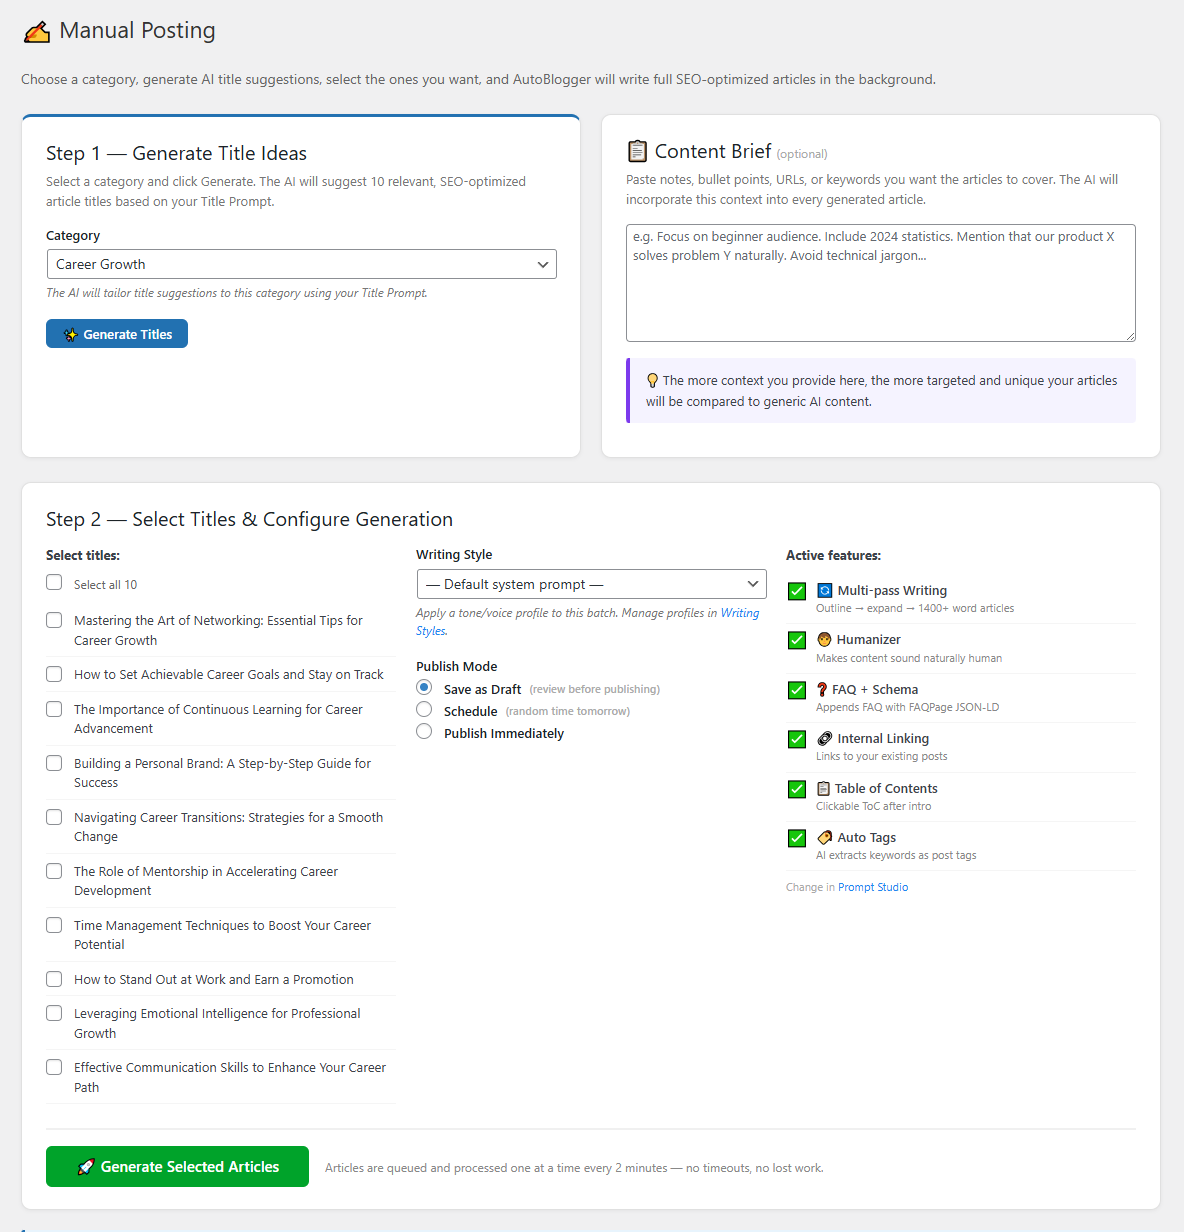
- Open MrNiche Autoblogger Pro → Manual Generation.
- Type a title (or click Suggest to have GPT propose 5 titles based on a category).
- Pick a category, optionally a writing style, then click Generate.
- The job lands in the queue; the generator runs every 2 minutes via WP-Cron. Refresh Queue to watch progress.
- Once published, you’ll find the article in Posts → All Posts tagged with
_oaib_generatedmeta.
Step 5 — Turn on AutoPilot (optional)
Once you’re happy with the output, head to MrNiche Autoblogger Pro → AutoPilot and enable scheduled generation. Pick a cadence (e.g. 2 articles/day), choose source categories, and walk away. MrNiche Autoblogger picks topics from your categories, queues them, and publishes on schedule. See the AutoPilot guide for the full configuration.
Bring Your Own Titles
Already have a keyword list or a content plan? Paste up to 50 titles (one per line) into the Bring Your Own Titles card on Manual Posting, pick a category, style, and publish mode, and they all enter the generation queue. Duplicate and near-duplicate detection runs on every title — including against each other — so “Best AI Plugins 2026” and “Top AI Plugins for 2026” won’t both get written.
Draft, Schedule, or Publish — pick your safety level
The default publish mode (Prompt Studio → Post Settings) controls what happens after generation: Draft (you review everything — recommended while dialing in your style), Schedule (articles generate now but publish on future dates, spread out by your Scheduled-Posts-Per-Day cadence — you can still review or edit any of them before their date), or Publish Immediately. A common workflow: run Draft mode for your first ten articles, then switch to Schedule once the output consistently matches your voice.
Next steps
- 📚 Configure AutoPilot for hands-off publishing
- ✍️ Build writing styles per category
- 🎯 Wire up SEO integration with Yoast or Rank Math
Stuck on setup?
Send us a ticket and we’ll walk you through it personally — usually within 24 hours.